Wednesday 21 October 2015

A Collection of Cards

Hey there! Happy Autumn!


Welcome to C1Make1.  It's been ages since I posted here.  As Bilbo might say "I've been off on a series of adventures".  But now I'm back, and with my creative compulsions in full force. What to do, what to do?  Since my card box was sadly depleted and it galls me to pay 6 to 8 bucks for a card made by a machine, I declared this past weekend as an official card-making holiday.  And I'm pretty happy with the results.  Got 25 cards made, some for all occasions and birthdays, and some for Christmas.  Making cards is a great way to mix and match stray papers and leftovers in your stash, and to use up some of that mountain of bling and ribbon you have.  (No, I have not been peeking in your craft-room windows!) 

I usually spend waaaay too much time agonizing over petty details so I made a deal with myself that there was going to be no perfectionism here, only some fun and relaxation.  And a little productivity. It was the best therapy I could have asked for.  So here's some of the results of my labors.  I got most of the basic ideas from Pinterest and adapted them to my stash and liking.  I have not included any instructions because they're just so simple and a picture tells the whole story basically. 


My daughter says this one reminds her of a Christmas cookie.


Washi tape.  Yep. Got a stash of that too.


The inside of my gatefold card.  Lots of space for a message.


None of these cards took more than a few minutes to make and other than my Bigshot Embosser, no specialized equipment was needed either.  And none of them are perfect.  Just the way handmade cards should be.  
 
Thanks for stopping by.  Hope to have something fun and interesting to post soon.  No more of this ridiculous "off on an adventure" stuff.  See you soon!


Wednesday 25 June 2014

Summer gatefold album

Hi Everybody! 
Been crazy busy around this place (it IS summer now you know...) so it's been a while since I posted.  But I haven't stopped being creative completely.  I have another mini album to share with you, this time a cute summer one I made for my mom.  She made a trip to Newfoundland early this summer, a trip that's been on her bucket list for a long time, and I wanted to make a nautical themed album to house some of her fave pictures. 
 
I used a Close to My Heart retired paper collection called "Tommy" that I had in my stash, along with chipboard and kraft cardstock for the covers and Kraft envelopes for the pages. 
 
 
I love the bright cheery colors of this pack, and the nautical images were perfect for a sea side trip. 


I decided on an offset gatefold style album, with pages coming from both sides.  The album measures 7" x 7" x 2 1/4" and has 12 pages in all.
  The cover closes with the aid of three large magnets, hidden under the decorative paper.  They keep the covers closed even if she stuffs the album full of pictures.


Inside the front cover is a large pocket, suitable for memorabilia and brochures from some of the B & B's she stayed at.  The captains wheel and the other large accents I made by printing out clip art onto white cardstock in blue ink, then covering them with liquid glass to turn them into shiny accents.  I fussy cut them out of the paper after I applied the liquid glass and it had completely dried.  This helps to prevent a lot of curling and warping of the images.


The pages are very simple in design.  My mom is doesn't scrap with a lot of embellishments so I wanted to keep them open and with lots of space for her terrific pictures.


Each page on the left has a 4" x 6" flap, and each page on the right has a
5"x 6" flap that opens to reveal a large pocket with a removable 5" x 5" photo mat, usable on both sides.


I punched out some of the nautical symbols from this fun and busy patterned paper to accent the corners of the flaps and some of the other plainer pages. 


The back inside cover sports another large pocket that houses journaling mats and has plenty of room for more memorabilia.
 
 
So that's my nautical "Tommy" album, simple and practical but also fun and interactive.  I'm hoping my mom will enjoy it, and add her own special touch to it as she adds her pictures and memorabilia.
 
If you want to know how to build one of these, see my previous blog entry "Gatefold Mini Album Instructions" which provides detailed instructions on building covers and pages as well as the hinge system that holds it all together.  The cover is a little different in that it's offset and has a magnet closure.  Otherwise it's pretty much the same.  Have fun!
 
Thanks for stopping by!  See you next time...


Sunday 15 June 2014

Fancy Fold Cards

Welcome to C1Make1 !  I'm happy you've joined us for this June blog hop. 

If you just arrived here from visiting Carol at "Crafty Carol's Place"  then you are in the right place.  If you just happened to come here first, you can hop your way across the country by starting with Michelle at My Creations with Michelle .  And if you get lost along the way Michelle has the whole line-up for you. 

Please post comments on each blog--we love to get feedback and to learn what interests you.  And so... on with the hop!  This month we're featuring Fancy Fold creations. 


I'm featuring two cards for this hop, one feminine and one masculine.  The first is a Criss-Cross card featuring the beautiful "Ariana" paper collection from Close to My Heart.

 
This card is both card and envelope in one and you can add more embellishments if desired.  I thought the paper was so pretty that it didn't need any further embellishment. 


You can stamp on the insert or hand-write a special message.  In this case I've stamped a sentiment I like and left room for a personal handwritten message.  It's also perfect for adding a gift card if you want, tucked into the fold or attached to the insert.


This fun card is called a Lever Card.  I've made mine from the Close to My Heart "Timberline" paper collection.  The sentiment and camper picture lay flat when the card is closed but lever through the card on an angle when it's opened. 
 
Here's what I used for these two cards:
 
Criss cross card: 
 
 Ariana paper collection
White Daisy cardstock
Ariana Scrapbooking Workshop on the Go Stamp set (D1589)
Crystal Blue ink
Outdoor denim ink
Fiskars corner punch for the insert portion of the card
A little bit of blue ribbon I had in my stash.
 
Lever Card:
 
Timberline paper collection
White Daisy Cardstock
 Camper Crazy Stamp set (C1578)
Alcohol markers in Goldrush, Ponderosa Pine, Twilight, and Buttercup
 
If you want to try making one yourself, check out these two great tutorials:


If you'd like to see a mini album made with fancy fold pages, check out my Balloon Ride blog post here .
 
The next stop on our cross country hop is with Brandy at Canadian Scrappers.  Have fun and leave me a comment before you go if you'd like! 
 

Wednesday 11 June 2014

Build a Page

Hello Everyone!  Welcome to C1Make1.

I have had lots of questions about how I build my mini albums.  There's a ton of stuff on YouTube about how to build pages, but I thought I would share here how I make base pages for mini albums like my "Babycakes" binder album and my "Friends" mini album, featured in previous posts.  This page construction can be made any size you like and used with any binding system you prefer, so it's versatile and easy.  Both good qualities, I'm thinking.  I use these base pages and add fold-outs, pockets, double pockets or any other type of additions that I want to customize my albums. 

First of all, decide what size you want your pages.  For example, a 9" x 9" album would generally have 8" x 8" or 8 1/2" x 8 1/2" pages so that they fit nicely inside the covers.  An album where you want to decorate the pages with 6" x 6" paper would generally have pages 6 1/2" x 6 1/2" or 7" x 7" and a cover that's about 7 1/2" x 7 1/2" or slightly larger.  You can adjust these measurements depending on whether your pages will have tabs, or if you just want more or less of the cover extending beyond your page edges.

          To make a basic page, without additional pockets or flaps:

To make a sturdy, double-thickness page that also functions as a large pocket, cut one piece of paper 1" bigger (in one direction) than your desired page size.  This leaves 1/2" on either side for tabs to which you'll attach the other half of the page.  For example, for an 8" x 8" page, cut a piece of cardstock that is 8" x 9".  With the 9" side at the top of the scorboard, score it at 1/2" and 8 1/2".  If you were doing a 5" x 7" page with a landscape orientation (wider than it is tall), you'd cut your piece at 5" x 8" and score on the 8" side at 1/2" and 7 1/2".  A portrait orientation (taller than it is wide) of a 5" x 7" would be cut at 6" x 7" and scored on the 6" side at 1/2" and 5 1/2".  Your flaps are always created by scoring 1/2" from the left and right edges of your paper, regardless of page size.  Your binding system will determine which way your pocket opens. 


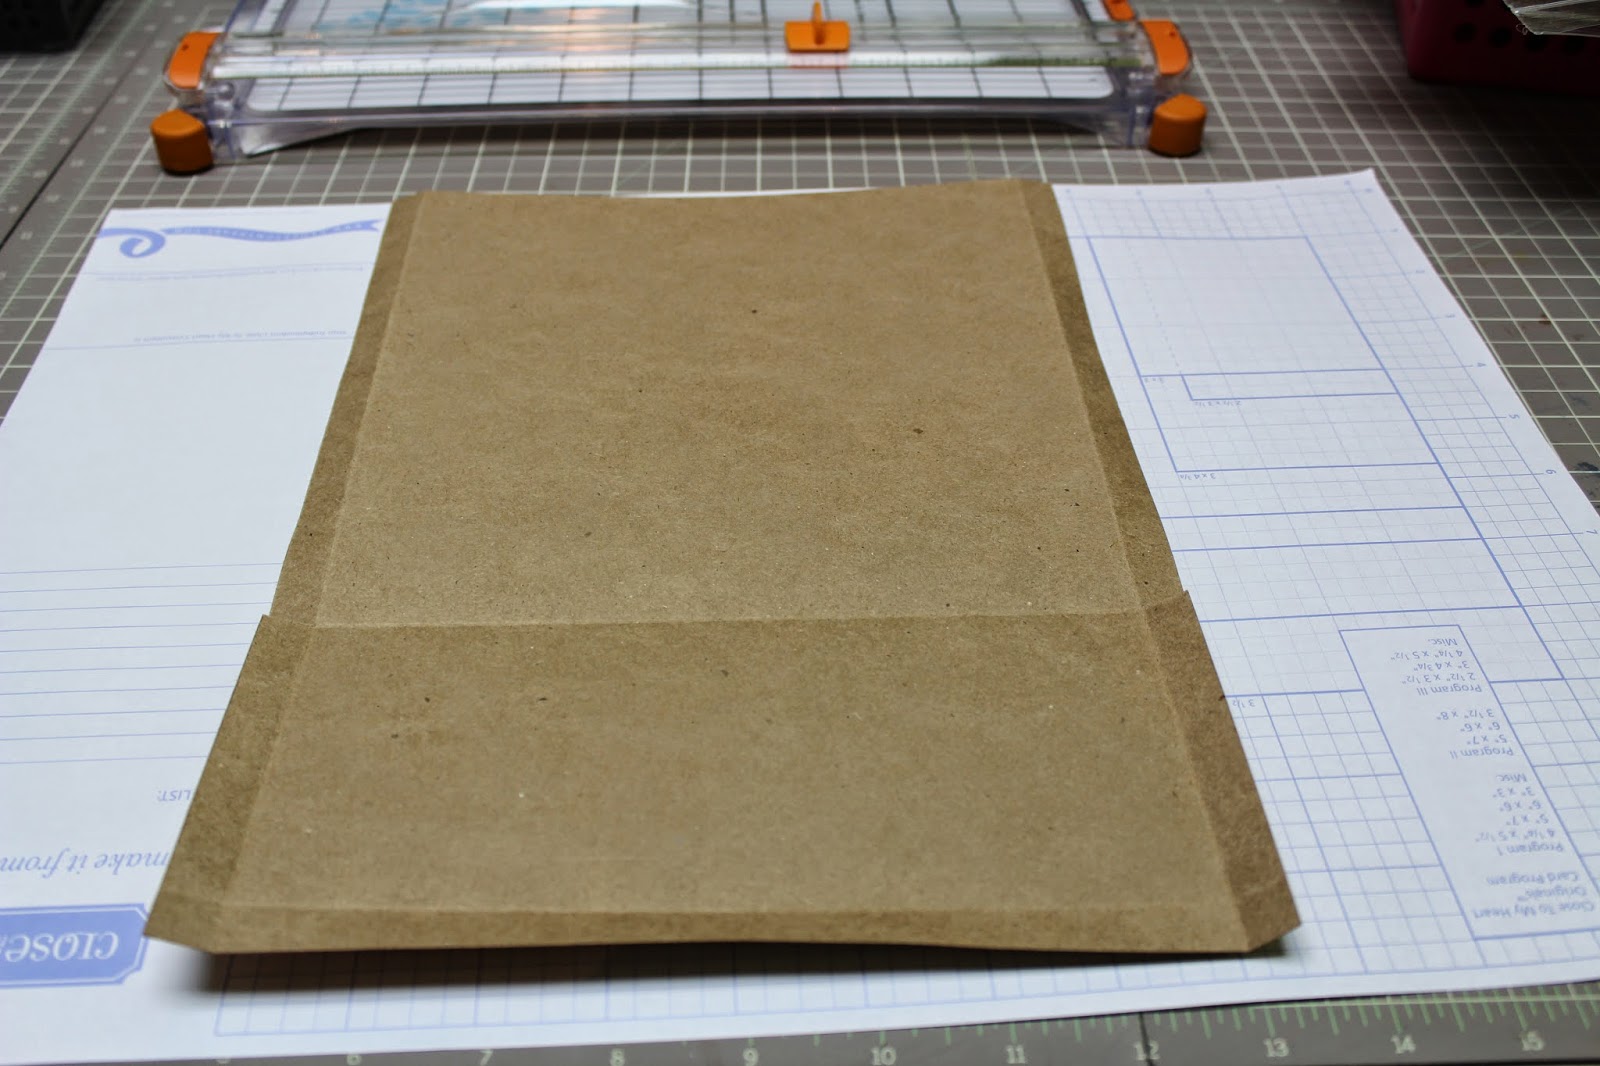
Paper cut and scored, then tabs in folded position.
 
Once you've decided on page size, and cut and scored your paper, fold on the score lines.  Apply double sided tape on the tabs while they are in the folded position.  (see picture above)  Trim the ends of each tab on an angle once you have the tape in place.
Cut a second piece of cardstock the desired size of your page; for an 8" x 8" page, this piece will be cut at 8" x 8".  For a 5" x 7" page, this piece would be cut at 5" x 7".


Pull the backing off the tape on your flaps, and attach your second piece of cardstock, one side at a time, being careful to line up the edges on all sides.  This forms a cardstock "tube" as shown below.

 
This is your base page, open on both ends.  The sides with the flaps become your closed edges, and the other two edges can be left open to form pockets, attach to hinge systems, or can be glued closed later.  You can see that simply by changing the placement of the open edge in your book, you have either a top loading pocket or a side loading one, and can use either opening on a portrait orientation or a landscape orientation page.  If you want to use it with a hidden hinge or "stack the deck" binding system, leave the two ends open and use one of them to attach to the hinge. 
I'll put some links at the end of this post to sites where you can see different binding systems.
 
To make a basic single page with a pocket:
 
Here's an example of a pocket page (right side) from my Babycakes album.


Cut a piece of cardstock that is 1" wider than your desired page width and is 3 or 4" longer than your page length.  In this example, I cut the paper at 9" x 12" for an 8" x 8" page.  I scored it at 1/2" and 8 1/2", then flipped it to the 12" side and scored it at 8" and 11 1/2".


Trim out the corners of the bottom edge as shown above.  Then cut on the 8" line in just to the 1/2" score mark on the left side and to the 8 1/2" score line on the right side.  This gives you a flap at the bottom, and one on each side.  The long side edges will now be divided into two flaps, one is 8" long, the other 4". 


Place double sided tape on the bottom flap in the open position and trim the ends on an angle. 


Remove the tape backing and stick the flap down.


Place double sided tape on the bottom short side flaps in the folded position.  Trim the ends at an angle as you did for the previous flap.  Fold on the 8" score line, remove the tape backing and fold the bottom piece up, with tabs in the folded position, attaching it to the top portion of the piece as shown in the photos below.

 
Divided flap created by cutting along the 8" score line just to the 1/2" and the 8 1/2" score lines.  The short tabs on the bottom are in the folded position, and the longer tabs on the top portion are in the open position.

 
Flaps in the folded position. 

 
Tape on the flaps in the folded position.

 
The resulting pocket, which has a flap running vertically down both edges.  You will apply double sided tape to these remaining flaps while they are in the open position.
 
 
  Apply double sided tape to the long tabs while they are in the open position.  Then flip the entire page over so that the pocket is underneath and the long flaps are up.  Fold the tabs up towards you.  The tape should be facing you when the tabs are in the folded position.  Cut a second piece of cardstock at 8" x 8" (or the desired page size).  Remove the backing from the tape on the flaps of the first piece.  Attach the second piece of cardstock to the tabs of the first piece just as you did for the plain page.  You now have a page that is a large pocket, plain on one side, with a smaller pocket on the other, and open on both ends.  Use a thin bead of glue on the bottom open edge of the page where the small pocket sits, leaving the top edge of the page  open.


Thin bead of glue in place in bottom edge of page. 


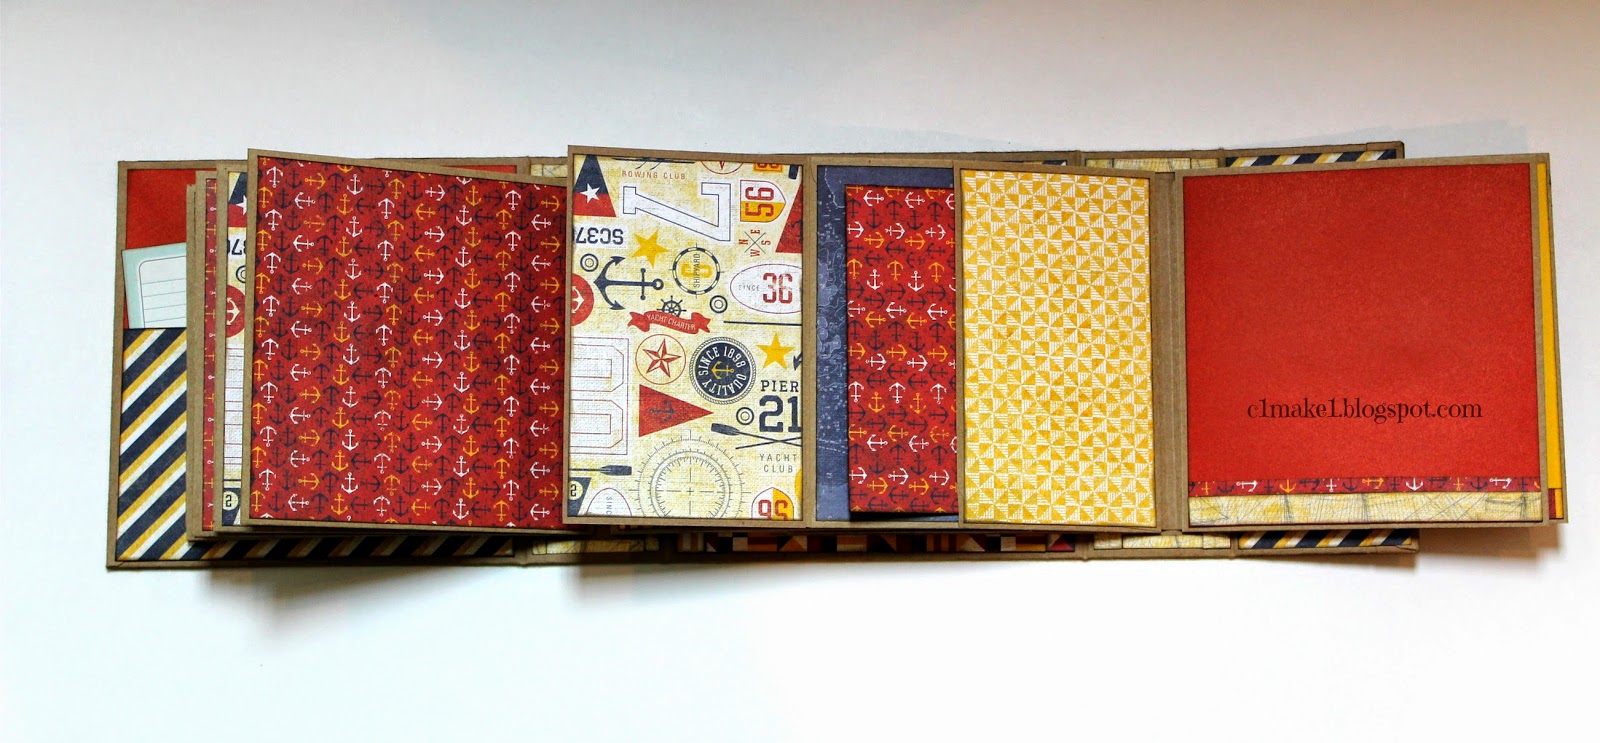
Here's another example of finished pocket pages.  The left and right sides are closed because they're the ones where the flaps attach the two pieces of cardstock together.  The top is open and becomes the opening of the pocket page. The bottom edge of the page has been glued shut forming a large pocket the size of the entire page.  It holds a large tabbed mat.  The small pocket part of the page is created when you fold the first piece of cardstock back on itself and attach the flaps as in the directions above.
 
 
And that's how I make my pages.  They can be any size, and of portrait (vertical) or landscape (horizontal) orientation.  They work with any type of binding system.  I've added some links below so you can explore some of the different binding systems out there. 
 
 
You can check out Kathy Orta's hidden hinge system directions here .
 
Or try the "stack the deck" system by Laura Denison which you can learn all about here . 
 
Or if you want even MORE about binding systems, how about this one here .
 
I hope you have fun with inventing your own mini albums, and if you have any questions, feel free to contact me and I'll try to help.  Happy scrappin' everybody!  Now get on out there and glue something!

Babycakes Binder style Mini Album

I want to share with you a super cute baby album today!  Which is kind of odd, considering my kids are 21 and 19 years old.  I do have a baby album for my daughter, but never got around to making one for my son.  About time, wouldn't you say?  There's no photos in it for this post, because he made me swear I wouldn't splash baby pics of him all over the net.  :)

I decided to use the Close To My Heart Kraft three-ring binder as the base for the album.  I love the 9" x 9" size and the sturdiness of it.  It holds a lot of pages and can be completely customized.   I wanted double-thickness pocket style pages, with a large pocket for photo mats as my base, so I chose to make these from CTMH's Kraft cardstock.  If you prefer you can cut your pages from single sheets of cardstock using the Cricut and the CTMH Artbooking cartridge.  That way you can choose to cut pages in fun shapes or with decorative edges. 

I love the bright colors in the "Babycakes" paper collection, and the stamp set and accessories that match the paper are too cute to resist.  It works well for either a boy or a girl. 


The cover has a couple of Babycakes Picture My Life (PML) cards.  They coordinate perfectly with the 12" x 12" paper collection and add fun graphics and journaling spots.  I cut the "M" on my Cricut from sunset cardstock.  It's my son's initial.  I like the simple, graphic appeal of the cover images together.


Each base page is made from two pieces of Kraft cardstock, cut and scored then joined together to make the page.  The inside cover of the book has a small pocket with more PML cards where I can journal special memories. 


The first page is a base page with two flip-ups, magnetized to hold them in place.  PML cards provide accents and journaling spots, and there's still room for several photos.

 
I hole-punched each page as I made it, using a template I created from Kraft cardstock.  This ensures each page lines up well with the next. 


The Babycakes complements are perfect for accent pieces.  Here I've popped them off the page using dimensional adhesive, and done the same with a small PML card.  This gives a place to tuck a large card where I can mat a photograph.  This way I get to use both sides of the large card and can even mount another photo on the page itself if I choose too.  The pocket page is created by a process of folding and cutting, then decorated with the paper collection.  It gives me lots of room to put matted photos, journaling cards and memorabilia.


This page on the right is an accordion page, just for funzies.  I like the interactive nature of these pages and it's a little surprise when you open it.  Again, lots of room for photos and words.

 
Simple and cute die-cuts from the complements collection. 


The back of the accordion page is as fun as the front.  Another PML card for memory-keeping lives there. 


Two pocket pages here for me to stuff full of photos and memorabilia.  The giraffe and hippo are stamped on Colonial white cardstock and added to the pocket.  The hearts are part of the complements collection. 


I decorated these pages using the diagonal on the left side, to give your eye more to play with.  There is room for two 4" x 4" photos on each of those pages.

 
This page features a simple foldout with a so-cute lion cut with the Artbooking Cricut cartridge and stamped in Sunset ink.


The pages with their mix of patterns, colors and sizes makes this little album fun and perfect to showcase baby pictures. 


The last page and the inside back cover have double pockets.  They easily hold several PML cards.  I'm looking forward to recording milestones and memories on them. 


These big mats each fit into one of the large size pages and are double-sided.  Lots of real estate for displaying pictures.  I tabbed them to make it easy to slip them in and out of the pockets.  The album has eight pages in total, with six of them measuring 8" x 8".  There's plenty of room for another half dozen pages if I decide I need more.
 
I had a lot of fun with this album and paper collection and I've chosen most of the photos that will go into it.  I'm also already thinking about what to make with another "naked" binder album waiting in my stash...  Keep checking back with me here.  You never know what's next! 
 
Thanks for stopping by.  Leave me a comment or contact me if you have any questions.  I have an additional post this week showing how I built the base pages for this album and other ones like it.  Cheers!